-
Disk Cleanup: How to free up disk space
Many modern computers use SSD drives as their primary storage devices. They are fast and shock-resistant, but they have one serious drawback: their capacity is relatively limited. Even a quite powerful laptop may have an SSD drive of only 128 GB. As a result, free storage space is always scarce for SSD devices. Even for conventional hard drives, which are much larger in capacity, this still may be an issue; especially when they are installed in computers used for massive data processing tasks like heavy gaming, multimedia production, and desktop publishing.
Windows and its various programs consume a large amount of storage space for their caches, temporary data, and service files. Such files can be deleted or cleaned without harming Windows' performance. Some programs, like browsers, have special commands that clean their temporary files, cookies, history, and so on, but such commands have to be run manually every time the user closes the program. And Windows doesn't have built-in services that can do that job for the system at all.
As an example, we'll use a notebook with a freshly installed SSD device (128 GB). It has been used only for one week, mainly for internet surfing with the new Microsoft Edge browser, and for some simple office work using LibreOffice.
Cleaning up the disk using R-Wipe & Clean
It cannot be easier.
Download and install R-Wipe & Clean. You don't have to buy it immediately, as the software will work - with all of its features enabled - for 30 days without registration. If you are satisfied with its performance, you can purchase the software and register your copy. Moreover, even if you don't register it within the trial period, it will turn into R-Wipe & Clean Light; a free version that can still clean many essential items.
Run the program and click the 'Simple Disk Cleanup' button on the Traces Selection Helper bar.
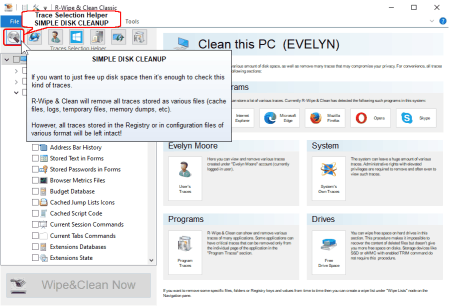
Fig.1. The Main panel and the Simple Disk Cleanup button
Click image to enlarge
R-Wipe & Clean will automatically select the necessary items. You may inspect the selected items by expanding their respective sections.
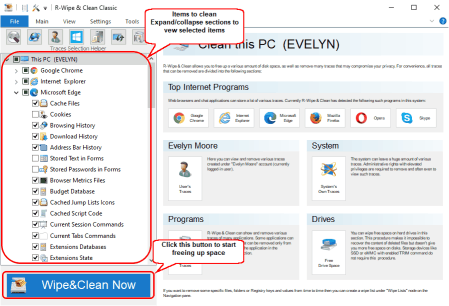
Fig.2. The Main panel with selected items to clean
Click image to enlarge
Then click the "Wipe & Clean Now" button. R-Wipe & Clean will start freeing up storage space in your computer showing its progress. Once it's complete, the report will be displayed.
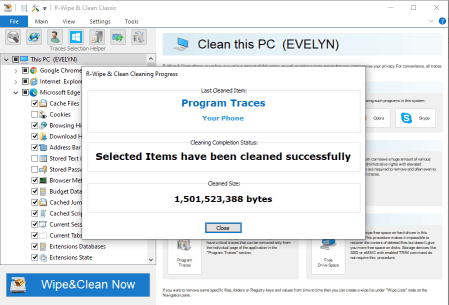
Fig.3. The results of disk cleanup
Click image to enlarge
You will see that the data garbage that has built up for only a week is more than 1.5 GB. This is quite substantial for a disk of only 128 GB. R-Wipe & Clean has deleted the unnecessary data and freed up a substantial amount of storage space.
Items that R-Wipe & Clean deletes during simple disk cleanup
For such operation, R-Wipe & Clean automatically select those items that are typically heavy storage space consumers, or "space hogs".
The most heavy space hogs in Windows are:
- Browser cache files are arguably the heaviest disk hogs. The cache is around 560 MB in our case.
- Game cache files (if the user has played them). No games have been played on our computer, so no such files exist in our case.
- Temporary files that the system creates when it runs programs. Windows stores them in the "Temp" folders. This data amounts to approximately 400 MB in our case.
Other space hogs aren't nearly as bad, but they still present issues in some scenarios:
- Temporary files created during system upgrades. Windows may not always completely delete them after such upgrades, and they can expand to huge sizes over time. They usually build up in the "Temp" folder. In our case, this data totaled approximately 100 MB.
- Problem reports and crash dumps created by a system component or application that may have often crashed. In our case, this amounted to 12 MB.
Although certain items might not occupy much space individually, they consume a lot when looked at collectively. In our case, these files amounted to approximately 300 MB.
- Application cache and temporary files.
- Some small files from browsers.
- Files with links to user's Recent Documents.
- Some small system caches.
- Logs of various system components.
One more important point: Many of the above-mentioned files may contain sensitive information about your activity. R-Wipe & Clean deletes them, thus protecting your privacy. Moreover, it specifically identifies SSD devices and distinguishes them from conventional hard drives. As such, it can wipe data accordingly. You may read more about protecting your privacy, data wiping, and so on in our article "Computer Privacy and Identity Theft Protection".
Simple disk cleanup does not touch on data such as this, especially if deletion may cause problems to the user. For example, it doesn't clean various logins and passwords for Internet sites, network computers, wifi networks, and alike. Nor does it delete the data that Windows uses to speed up its operation.
Disk cleanup automation: Tasks and Scheduler
We performed disk cleanup manually. But R-Wipe & Clean allows you to combine all those actions into one single wipe and clean task, which can be manually started directly from a desktop shortcut or scheduled to start automatically at a predefined time/event - like system shutdown, for example.
Moreover, you may divide this task into several parts, each of which scheduled to a separate event. For example, R-Wipe & Clean may be scheduled to delete data generated by Microsoft Edge upon its closure or even all system files during system shutdown.
To do so, click the Simple Disk Cleanup button and clear all sections except those you want to manipulate. Then schedule them to the desired event.
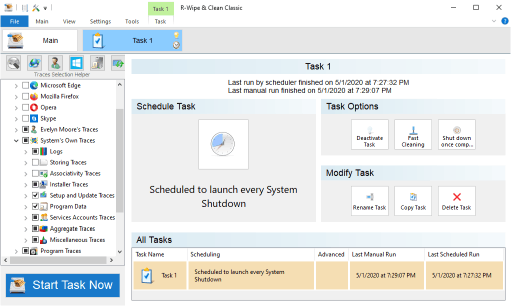
Fig.4. Scheduled disk cleanup task
Click image to enlarge
If the system disk is an SSD device, this task will not add much time to your average system shutdown. It may be quite long though when the cleanup takes place for the first time.
Already prepared tasks
Instead of creating your own tasks, you may download and import tasks that we already prepared for most common disk cleanup actions.
Select the necessary tasks from the table below, download them, and then import them into R-Wipe & Clean.
| Temporary and cache files to clean: | Scheduled to the event |
| Microsoft Edge | Closure of the Microsoft Edge browser |
| Internet Explorer | Closure of the Internet Explorer browser |
| Mozilla Firefox | Closure of the Mozilla Firefox browser |
| Opera | Closure of the Opera browser |
| Google Chrome | Closure of the Google Chrome browser |
| Skype | Closure of the Skype program |
| User's personal | User logoff |
| System's | System shutdown |
To import a downloaded task, go to the Tools menu and select Task Transfer. Then, click Import Tasks and select the tasks you want to import.
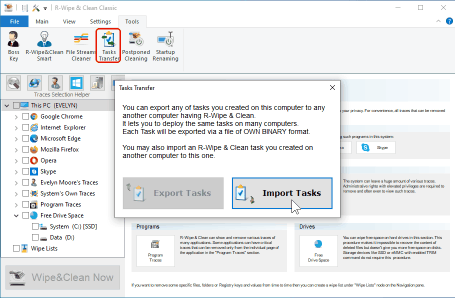
Fig.5. Import prescheduled tasks
Click image to enlarge
You may edit and re-scheduled these tasks if necessary.
You can read more about task scheduling on R-Wipe & Clean help page "Using Scheduler".
For more details about R-Wipe & Clean's full capabilities, read the R-Wipe & Clean manual and R-Wipe & Clean on-line help.
Also, join the discussion about R-Wipe & Clean on the R-TT Forum.
- R-Studio Technician: activation using a USB stick
- Data Recovery Guide
- Why R-Studio?
- R-Studio for Forensic and Data Recovery Business
- R-STUDIO Review on TopTenReviews
- File Recovery Specifics for SSD devices
- How to recover data from NVMe devices
- Predicting Success of Common Data Recovery Cases
- Recovery of Overwritten Data
- Emergency File Recovery Using R-Studio Emergency
- RAID Recovery Presentation
- R-Studio: Data recovery from a non-functional computer
- File Recovery from a Computer that Won't Boot
- Clone Disks Before File Recovery
- HD Video Recovery from SD cards
- File Recovery from an Unbootable Mac Computer
- The best way to recover files from a Mac system disk
- Data Recovery from an Encrypted Linux Disk after a System Crash
- Data Recovery from Apple Disk Images (.DMG files)
- File Recovery after Re-installing Windows
- R-Studio: Data Recovery over Network
- How To Use R-Studio Corporate Package
- Data Recovery from a Re-Formatted NTFS Disk
- Data Recovery from an ReFS disk
- Data Recovery from a Re-Formatted exFAT/FAT Disk
- Data Recovery from an Erased HFS Disk
- Data Recovery from an Erased APFS Disk
- Data Recovery from a Re-Formatted Ext2/3/4FS Disk
- Data Recovery from an XFS Disk
- Data Recovery from a Simple NAS
- How to connect virtual RAID and LVM/LDM volumes to the operating system
- Specifics of File Recovery After a Quick Format
- Data Recovery After Partition Manager Crash
- File Recovery vs. File Repair
- Data Recovery from Virtual Machines
- How to Recover Files from a Remote Computer Using R-Studio Standalone License and Its Network Capabilities in Demo Mode
- How to Connect Disks to a Computer
- Emergency Data Recovery over Network
- Data Recovery over the Internet
- Creating a Custom Known File Type for R-Studio
- Finding RAID parameters
- Recovering Partitions on a Damaged Disk
- NAT and Firewall Traversal for Remote Data Recovery
- Data Recovery from an External Disk with a Damaged File System
- File Recovery Basics
- Default Parameters of Software Stripe Sets (RAID 0) in Mac OS X
- Data Recovery from Virtual Hard Disk (VHD/VHDX) Files
- Data Recovery from Various File Container Formats and Encrypted Disks
- Automatic RAID Parameter Detection
- IntelligentScan Data Recovery Technology
- Multi-pass imaging in R-Studio
- Runtime Imaging in R-Studio
- Linear Imaging vs Runtime Imaging vs Multi-Pass Imaging
- USB Stabilizer Tech for unstable USB devices
- Joint work of R-Studio and PC-3000 UDMA hardware
- Joint work of R-Studio and HDDSuperClone
- R-Studio T80+ - A Professional Data Recovery and Forensic Solution for Small Business and Individuals Just for 1 USD/day
- Backup Articles
- R-Drive Image Standalone and Corporate license transferring
- Fixing Windows update error 0x80070643 with R-Drive Image
- Backup with Confidence
- R-Drive Image as a free powerful partition manager
- Computer Recovery and System Restore
- Disk Cloning and Mass System Deployment
- Accessing Individual Files or Folders on a Backed Up Disk Image
- R-Drive Image startup / bootable version
- File Backup for Personal Computers and Laptops of Home and Self-Employed Users
- Creating a Data Consistent, Space Efficient Data Backup Plan for a Small Business Server
- How to Move the Already Installed Windows from an Old HDD to a New SSD Device and Create a Hybrid Data Storage System
- How to Move an Installed Windows to a Larger Disk
- How to Move a BitLocker-Encrypted System Disk to a New Storage Device
- How to backup and restore disks on Linux and Mac computers using R-Drive Image
- R-Drive Image and Virtual Machines
- Undelete Articles
- Get Deleted Files Back
- Free Recovery from SD and Memory cards
- R-Undelete: Video Recovery
- Recovery from an External Device with a Damaged File System
- File recovery from a non-functional computer
- Free File Recovery from an Android Phone Memory Card
- Free Photo and Video File Recovery Tutorial
- Easy file recovery in three steps
Rating: 4.6 / 5
R-W&C has a feature that I really could learn to appretiate while looking for ways to speed-up family and friends pc`s: the wiping of the MFT. There is a reduction of the MFT size and an a quite noticeable increase in system response time due to that. Many times I would like to ONLY do the MFT, but alas as it is a secondary option of the Unused Space option, I always loose a lot of time wiping a ...
the the Trial product and after first use I imediately purchased it.
Two points though,
1, I cannot see how I can update R- Wipe& Clean.
2,I would like to purchase other products and I suggest discounts for
further purchases.
Well done a SUPERB PRODUCT


