- Contents
- Index
- R-Wipe & Clean Overview
- Classic Interface: Main Panel
- Touch Interface: Main Panel
© 2025 R-Tools Technology Inc.
All rights reserved.
Wipe Lists
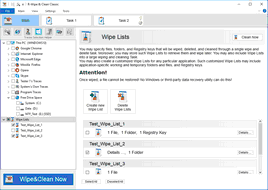
You may specify files and folders, and registry keys or key values that will be wiped and deleted through a single wipe and delete task on the Wipe Lists panel. Moreover, you may store such wipe lists to retrieve them and wipe later. You may also include wipe lists into a large wipe and clean task. Go to the Setting a Large Wipe and Clean Task section for details.
Some programs have their own temporary or scratch folders. It is wise to have them included in such wipe lists if you want to completely erase all temporary data from such programs.
Attention! Once wiped, a file cannot be restored! No Windows or third-party data recovery utility can do this!
To wipe a single wipe list,
• Select the required wipe list on the tree
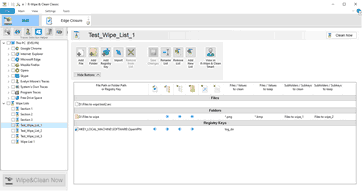
The contents of the selected wipe list will appear in the right pane.
|
|
Registry key: The value will be cleaned. |
|
|
Clean subfolders: All child subfolders will be cleaned recursively. |
|
|
Delete empty subfolders: All empty subfolders will be deleted. |
|
|
Delete folder: A folder or key will be deleted if it becomes empty. |
|
|
Delete read-only files |
|
|
Delete hidden files |
• Click the Clean Now button on the right pane.
R-Wipe & Clean will start cleaning the contents of the wipe list.
To wipe several wipe list at once,
• Select the required wipe lists on the tree
• Click the Clean Now button.
R-Wipe & Clean will start wiping the wipe list.
You may also manage wipe lists form the tab of a single wipe list using the wipe list management buttons.
 More information...
To create a new wipe list,• In the Tree, go to the Wipe Lists section • Click the Create new Wipe List button. A new wipe list will appear in the right pane. |
To remove a wipe list,• In the Tree, go to the Wipe Lists section • Click the Remove List button. R-Wipe & Clean will remove the wipe list. |
To save a new wipe list,• In the Tree, go to the required Wipe List • Click the Save Changes button on the wipe list management buttons. |
To rename a wipe list,• In the Tree, go to the required Wipe List • Click the Rename List button on the wipe list management buttons and enter a new name.. |
Managing files/folders in wipe lists
You may add a file or/and folder to the current wipe list directly from File Explorer. Right-click the file and select the Add to the Wipe List item from the shortcut menu. Make sure that the Add files and folders to a wipe list from the shortcut menu option is enabled on the Integration tab of the Settings panel.
You may add a single file by dragging and dropping it to the Wipe List .
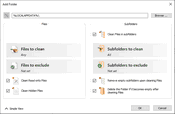
You may add/remove files and folders to/from the list using the file management buttons. When you add a folder to the wipe list, the Add folder... dialog box will appear. You may set a file mask for files in the folder and specify files that are not to be cleaned if they even match the file masks.
 Add folder options
|
% |
Adds an environment variable. |
|
Files to clean |
Specifies file masks to clean files in this folder. |
|
Files to exclude |
Specifies file masks to exclude files from cleaning in this folder |
|
Subfolders to clean |
Specifies subfolders to clean in this folder. |
|
Subfolders to exclude |
Specifies subfolders to exclude from cleaning in this folder. |
|
Clean files in subfolders |
If this option is selected, files in subfolders will be cleaned. |
|
Remove empty subfolders upon cleaning files |
If this option is selected, the folders will be deleted when its content is cleaned. |
|
Delete the folder if it becomes empty after cleaning files |
If this option is selected, the folder will be deleted if it becomes empty after cleaning files in it. |
|
Clean Read-only Files |
If this option is selected, read-only files will be cleaned, too. |
|
Clean Hidden Files |
If this option is selected, hidden files will be cleaned, too. |
Managing Registry keys in wipe lists
You may also add a key or specific value in a key from Registry that will be deleted.
 More information...
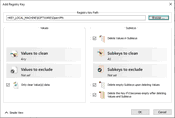
To add a registry key or key values to a wipe list,• In the Tree , select the required wipe list • Click the Add Registry Key button on the file management buttons and select the required Registry key or separate key value on the Add Registry Key dialog box to add them to the wipe list. You may add either all values in the selected key, or only specific values in it. The added Registry keys or values will appear in the wipe list. You may also add arbitrary custom values. Click the Add Custom Value button and specify the required values.
|
To remove a registry key or key values from a wipe list,• In the Tree , select and click the required wipe list • Select a registry key or key values you want to remove and click the Remove from List button on the file management buttons. The selected registry key or key values will be removed from the list. |
You may also import items from other wipe lists using the Import button on the file management buttons
Default file wiping settings may be specifically set on the Files Wiping Settings tab of the Settings panel.
- R-Studio Technician: activation using a USB stick
- Data Recovery Guide
- Why R-Studio?
- R-Studio for Forensic and Data Recovery Business
- R-STUDIO Review on TopTenReviews
- File Recovery Specifics for SSD devices
- How to recover data from NVMe devices
- Predicting Success of Common Data Recovery Cases
- Recovery of Overwritten Data
- Emergency File Recovery Using R-Studio Emergency
- RAID Recovery Presentation
- R-Studio: Data recovery from a non-functional computer
- File Recovery from a Computer that Won't Boot
- Clone Disks Before File Recovery
- HD Video Recovery from SD cards
- File Recovery from an Unbootable Mac Computer
- The best way to recover files from a Mac system disk
- Data Recovery from an Encrypted Linux Disk after a System Crash
- Data Recovery from Apple Disk Images (.DMG files)
- File Recovery after Re-installing Windows
- R-Studio: Data Recovery over Network
- How To Use R-Studio Corporate Package
- Data Recovery from a Re-Formatted NTFS Disk
- Data Recovery from an ReFS disk
- Data Recovery from a Re-Formatted exFAT/FAT Disk
- Data Recovery from an Erased HFS Disk
- Data Recovery from an Erased APFS Disk
- Data Recovery from a Re-Formatted Ext2/3/4FS Disk
- Data Recovery from an XFS Disk
- Data Recovery from a Simple NAS
- How to connect virtual RAID and LVM/LDM volumes to the operating system
- Specifics of File Recovery After a Quick Format
- Data Recovery After Partition Manager Crash
- File Recovery vs. File Repair
- Data Recovery from Virtual Machines
- How to Recover Files from a Remote Computer Using R-Studio Standalone License and Its Network Capabilities in Demo Mode
- How to Connect Disks to a Computer
- Emergency Data Recovery over Network
- Data Recovery over the Internet
- Creating a Custom Known File Type for R-Studio
- Finding RAID parameters
- Recovering Partitions on a Damaged Disk
- NAT and Firewall Traversal for Remote Data Recovery
- Data Recovery from an External Disk with a Damaged File System
- File Recovery Basics
- Default Parameters of Software Stripe Sets (RAID 0) in Mac OS X
- Data Recovery from Virtual Hard Disk (VHD/VHDX) Files
- Data Recovery from Various File Container Formats and Encrypted Disks
- Automatic RAID Parameter Detection
- IntelligentScan Data Recovery Technology
- Multi-pass imaging in R-Studio
- Runtime Imaging in R-Studio
- Linear Imaging vs Runtime Imaging vs Multi-Pass Imaging
- USB Stabilizer Tech for unstable USB devices
- Joint work of R-Studio and PC-3000 UDMA hardware
- Joint work of R-Studio and HDDSuperClone
- R-Studio T80+ - A Professional Data Recovery and Forensic Solution for Small Business and Individuals Just for 1 USD/day
- Backup Articles
- R-Drive Image Standalone and Corporate license transferring
- Fixing Windows update error 0x80070643 with R-Drive Image
- Backup with Confidence
- R-Drive Image as a free powerful partition manager
- Computer Recovery and System Restore
- Disk Cloning and Mass System Deployment
- Accessing Individual Files or Folders on a Backed Up Disk Image
- R-Drive Image startup / bootable version
- File Backup for Personal Computers and Laptops of Home and Self-Employed Users
- Creating a Data Consistent, Space Efficient Data Backup Plan for a Small Business Server
- How to Move the Already Installed Windows from an Old HDD to a New SSD Device and Create a Hybrid Data Storage System
- How to Move an Installed Windows to a Larger Disk
- How to Move a BitLocker-Encrypted System Disk to a New Storage Device
- How to backup and restore disks on Linux and Mac computers using R-Drive Image
- R-Drive Image and Virtual Machines
- Undelete Articles
- Get Deleted Files Back
- Free Recovery from SD and Memory cards
- R-Undelete: Video Recovery
- Recovery from an External Device with a Damaged File System
- File recovery from a non-functional computer
- Free File Recovery from an Android Phone Memory Card
- Free Photo and Video File Recovery Tutorial
- Easy file recovery in three steps

